
YUMI Legacy is the original Universal Multiboot Installer – a free Windows tool for creating BIOS-only multiboot USB drives containing multiple operating systems, antivirus scanners, diagnostic utilities, and bootable tools on a single flash drive. It uses Syslinux as its primary bootloader and supports FAT32 and NTFS formatted drives, with each ISO stored in its own organized folder under the YUMI multiboot directory.
Note: YUMI Legacy is archived and no longer actively maintained. It does not support UEFI booting, exFAT formatting, or ISO files larger than 4GB on FAT32. For a modern, actively maintained alternative with full UEFI support and no file size restrictions, use YUMI exFAT instead.

What Is YUMI Legacy?
YUMI (Your Universal Multiboot Installer) Legacy is the earliest variant of the YUMI USB boot maker, designed for computers running legacy BIOS firmware rather than UEFI. It lets you build a custom multiboot USB drive containing whichever distributions and tools you choose, presented in a boot menu in the order they were installed.
Each ISO is stored in its own folder inside the YUMI multiboot directory, keeping the drive organized while leaving the remaining space usable for standard file storage. Distributions can be added or removed at any time by re-running the tool – no reformatting required.
Although originally designed for booting live Linux environments from USB, YUMI Legacy also supports Linux installation to a hard drive and Windows installers in legacy BIOS mode.
YUMI Legacy (BIOS USB Boot Only): Use this version only if your computer supports BIOS booting and you do not need UEFI mode. Most modern motherboards still offer legacy BIOS support through CSM (Compatibility Support Module). For all other use cases, YUMI exFAT is strongly recommended.
Install ISO Files to USB from the Setup Screen

Run ISOs from the Multiboot USB Boot Menu
YUMI Legacy Limitations
- Filesystem: FAT32 or NTFS only – exFAT is not supported. Syslinux will fail and the drive will not boot if formatted as exFAT or GPT.
- Boot mode: BIOS/Legacy only – no UEFI boot support.
- File size: FAT32 cannot store individual files larger than 4GB. Switch to NTFS for large ISO files, though not all distributions are compatible with NTFS.
- No active development: Archived – bugs may exist that will not be fixed in future releases.
Download YUMI Legacy
WARNING: The Legacy variant is archived and no longer actively updated. It may have untested bugs that prevent it from working correctly. Use YUMI exFAT for a fully maintained alternative with UEFI support, exFAT formatting, and no 4GB file size limit.
YUMI Legacy Changelog
- – YUMI-2.0.9.4.exe: Added support for newer versions of Redo Rescue Backup and Recovery.
System Requirements
YUMI will format your selected USB drive during preparation – all partitions on the disk will be erased. Back up any data you want to keep before running the tool.
NOTE: The drive must use FAT32 or NTFS with an MBR partition table. Syslinux will fail on exFAT or GPT-partitioned drives, and the USB will not boot. NTFS is required for files over 4GB but may not be compatible with every distribution.
- USB flash drive, 2GB minimum (128GB-1TB works well)
- Computer capable of BIOS/legacy USB boot
- Windows 7, 8, 10, or 11
- YUMI Legacy installer
- Your chosen ISO files
For best performance, use a fast flash drive – see our fastest USB flash drives guide.
How to Create a Multiboot USB Flash Drive on Windows
- Run YUMI and follow the on-screen instructions to prepare the drive and add your first ISO.
- Run the tool again to add more distributions or tools to the same drive.
- Leave the USB drive inserted and restart your computer.
- During POST (when text first appears on screen), press the appropriate hotkey to enter BIOS.
- Set the USB drive as the first boot device, save changes, and exit.
- From the YUMI boot menu, select a distribution or tool to launch.
If all went well, you are now booting from your custom YUMI Legacy multiboot USB drive.
How YUMI Legacy Multiboot USB Works
YUMI Legacy lets each user build a custom multiboot USB containing only the distributions they want, in the order they were installed. Each time the tool runs, a new entry is appended to the boot menu. If YUMI is run from the same directory where ISO files are stored, they are auto-detected, removing the need to browse for each file manually.
Other Notes: If MultibootISOs was previously used on the drive, reformat it and start fresh. YUMI Legacy boots via Syslinux and chain-loads to GRUB only when needed – it is not compatible with the older MultibootISOs tool or with YUMI UEFI drives.
Supported Bootable ISO Files
The following is a reference list of bootable Linux distributions, portable OS tools, Windows installers, antivirus rescue disks, and system utilities that can be installed and booted from USB using YUMI Legacy. Support varies between YUMI variants and this list is not exhaustive.
| Category | ISO / Distribution / Tool |
|---|---|
| Popular Linux Distributions |
|
| Other Distros (A-Z) |
|
| Bootable Virtual Machines | ProxMox (Virtual Machine Environment) |
| Antivirus & Rescue Tools |
|
| System & Recovery Tools |
|
| Windows Installers & Boot Tools |
|
| Unlisted ISO Options |
|
Frequently Asked Questions (FAQ)
What is YUMI Legacy used for?
YUMI Legacy is a BIOS-only multiboot USB creator for Windows. It stores multiple bootable ISO files – Linux distributions, Windows installers, antivirus rescue disks, and diagnostic tools – on a single FAT32 or NTFS formatted USB drive, with a Syslinux-based boot menu that appears at startup. It is archived and no longer actively maintained; YUMI exFAT is the recommended replacement.
Does YUMI Legacy support UEFI boot?
No. YUMI Legacy uses Syslinux and supports BIOS/legacy boot only. It does not support UEFI booting. For UEFI compatibility, use YUMI exFAT, which supports both BIOS and UEFI firmware from the same drive.
Can I install Windows using YUMI Legacy?
Yes. YUMI Legacy supports Windows installers for XP through Windows 11, but only in legacy BIOS mode. Use NTFS formatting for Windows installers, as FAT32 cannot store files larger than 4GB. YUMI Legacy cannot run Windows installers in UEFI mode.
What file systems does YUMI Legacy support?
YUMI Legacy supports FAT32 and NTFS with an MBR partition table. exFAT and GPT are not supported – Syslinux will fail and the drive will not boot. FAT32 has a 4GB per-file size limit; NTFS removes that restriction but may not be compatible with every distribution.
Why do I get a Syslinux error during installation?
This typically means the USB drive is not formatted correctly. The drive must use FAT32 or NTFS with an MBR (Master Boot Record) partition table. exFAT and GPT partitions are not supported. If you see the error “Insane primary (MBR) partition”, replace the chain.c32 file in multiboot/chain.c32 with the version linked in the troubleshooting section below. If the problem persists, restore the drive to factory state and try again.
Can I save changes persistently with YUMI Legacy?
Yes, for supported Ubuntu-based distributions using the casper-rw persistence method. Multiple distributions can each have their own persistence file. Note that persistence may not work on NTFS-formatted drives or with all distributions.
Can I add more ISOs after the initial setup?
Yes. Re-run YUMI Legacy, select your USB drive, and choose the next ISO to add. The tool appends the new entry to the existing boot menu without reformatting the drive.
What size USB drive do I need?
A minimum of 2GB is required, though 128GB to 1TB works well for multiboot use. A fast SSD-based flash drive will give the best performance – see our fastest USB drives guide.
Is YUMI Legacy still maintained?
No. YUMI Legacy is archived and receives no further updates. For active development, UEFI support, exFAT formatting, and ISO files over 4GB, switch to YUMI exFAT.
Troubleshooting & Known Issues
- Error (1) occurred while executing Syslinux
-
An error (1) occurred while executing syslinux. Your USB drive won’t be bootable.
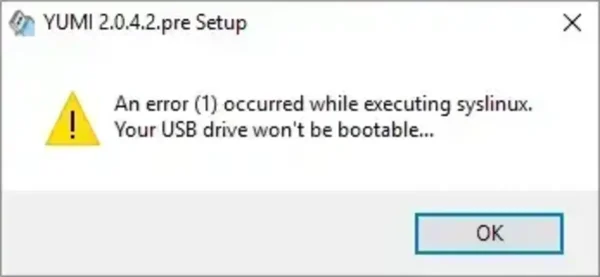
The drive must be formatted as FAT32 or NTFS with an MBR partition table. exFAT and GPT are not supported. If you also see:
Insane primary (MBR) partition. Can’t find myself on the drive I booted from
Replace the
chain.c32file located atmultiboot/chain.c32on the USB drive with this updated chain.c32 file. If the issue persists, the drive may be improperly partitioned or your BIOS may not detect it correctly. Try restoring the USB drive to its factory state and starting over. - Windows To Go and Windows Installer Options Explained
- The Windows To Go option creates a 20GB VHD file and requires an NTFS-formatted drive – FAT32 is not supported due to the 4GB file size limit. Fast flash drives are strongly recommended for acceptable performance.
On first boot, Windows runs its initial setup process, reboots, and requires a second boot to complete configuration.
- Single Windows Installer/PE: Use for a single stock or modified Windows ISO.
- Multiple Windows Installer/PE: Use for storing multiple stock Windows installers on one drive.
- -wimboot: Stores extracted Windows installers in separate directories.
- -bootmgr: Moves
bootmgrand BCD files to the root of the drive (requires Windows Vista or later andbcdedit).
YUMI Legacy does not natively support UEFI boot for Windows. Manual UEFI setup is possible by moving
bootmgr,bootmgr.efi, and the boot folder to the root of the drive, but this is unsupported and may not work reliably. - Try an Unlisted ISO – Options Explained
-
- Try Unlisted ISO (GRUB Partition 4): Boots an ISO using GRUB with a 4th partition table placeholder.
- Try Unlisted ISO (GRUB): Boots an ISO using GRUB without creating a partition placeholder.
- Try Unlisted ISO (GRUB from RAM): Loads a small ISO entirely into system memory, freeing the USB port for other use during the session.
- Try Unlisted ISO (Syslinux): The original boot method – works for many distributions but not all.
- Persistent Storage – Saving Changes Across Reboots
- YUMI Legacy supports the
casper-rwpersistence method for Ubuntu-based distributions. Multiple distributions can coexist on the same drive, each with its owncasper-rwfile. Persistence may not function correctly on NTFS-formatted drives or with non-Ubuntu-based distributions. - Ophcrack Password Tables
- To use Ophcrack rainbow tables, create a
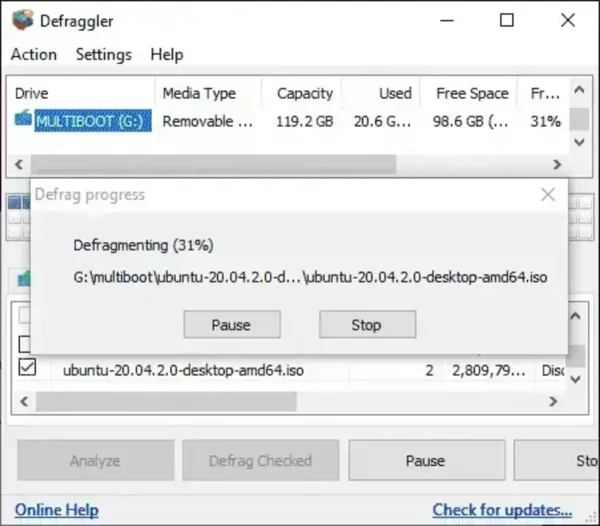
tablesfolder in the USB root directory (e.g.F:\tables\vista_free) and download the appropriate tables from the official Ophcrack site. Multiple Windows version table sets can coexist on the same drive. - Error 60: File for drive emulation must be in one contiguous disk area
- This error typically occurs with persistence files on NTFS drives due to file fragmentation. Fix it by defragmenting the ISO or persistence file using a tool such as Defraggler:
- Open Defraggler and select your USB drive.
- Check the box next to the fragmented ISO or persistence file.
- Click Analyze (optional) then Defrag Checked.
Final Notes
YUMI Legacy was the first multiboot USB creator of its kind – a practical tool for building BIOS-bootable drives loaded with Linux distributions, Windows installers, antivirus rescue disks, and diagnostic utilities from a single flash drive. It remains useful for older hardware where UEFI is not available, but it is archived, receives no updates, and lacks UEFI support, exFAT support, and the ability to handle ISO files over 4GB on FAT32.
For any modern system or use case, YUMI exFAT is the recommended replacement – actively maintained, UEFI-compatible, and free from the FAT32 file size restriction.