
YUMI (Your Universal Multiboot Installer) is a free multiboot USB creator for Windows and Linux. It allows you to store and boot multiple ISO files from one USB flash drive or micro SD card. Select to add from a range of bootable ISO files including such things as live Linux distributions, Windows installers, antivirus rescue disks, system recovery tools, and PC diagnostics. Each selectable from a boot menu at startup.
With support for both UEFI and legacy BIOS systems, files larger than 4GB, and optional persistent storage, YUMI is the go-to bootable USB tool for system administrators, IT technicians, and Linux enthusiasts who need a reliable all-in-one portable toolkit.


YUMI has evolved into a modern cross platform multiboot solution with YUMI Py, a Python based port and rewrite that brings native support to Windows and Linux. For users who prefer the established exFAT based workflow, YUMI exFAT remains available with support for large ISO files, UEFI and legacy BIOS booting, and persistent storage.
Launch multiple live Linux OS, PC diagnostic software, antivirus, windows PE, Windows setup, etc, from the same bootable USB drive. For system administrators, IT technicians or just PC enthusiasts, YUMI is an ultimate multi boot USB utility that allows you to carry out multitudes of tasks that were previously impossible without creating many different bootable USB Flash Drives.

Create a multiboot USB key using the tool’s intuitive graphical user interface and then set your computer to boot from it.
How YUMI Works
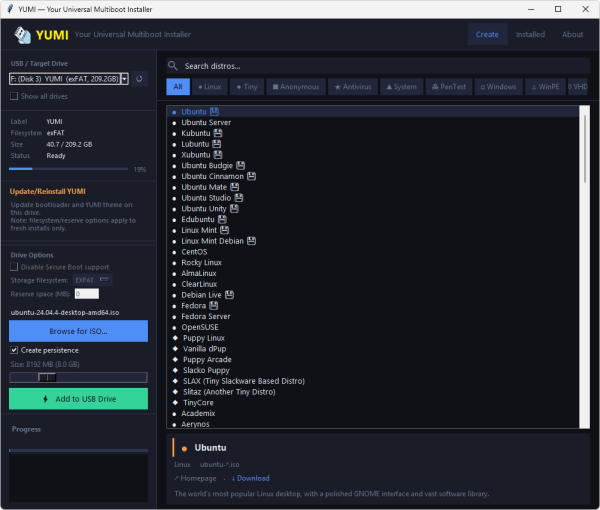
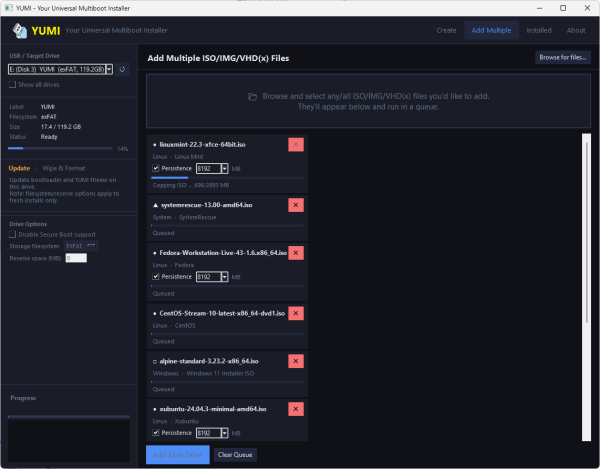
YUMI stores each ISO file in its own organized folder on the USB drive and builds a boot menu automatically. At startup, you select which operating system or tool to launch. You can add or remove ISOs at any time by re-running the application – no reformatting required.
YUMI supports persistent storage for Linux distributions, letting you save files, settings, and installed packages across reboots. It also handles unlisted ISO and IMG files via drag and drop, making it flexible enough to accommodate tools not explicitly on its supported list.
Crafted with an intuitive interface and extensive hardware compatibility, YUMI streamlines multi-boot USB creation, empowering both casual Linux users and seasoned PC technicians alike.

What Is a Bootable USB?
A bootable USB is a flash drive or micro SD card that is prepared to boot a specific software or operating system upon launch instead of booting from the computer’s internal storage device. Bootable drives are used across desktops, laptops, and embedded systems for a wide range of tasks.
The most common reasons to make a bootable USB drive include:
- Operating System Installation: Install or reinstall Windows, Linux, or other operating systems without a CD or DVD. Boot from the USB drive and follow the usual setup prompts to install directly to the computer’s internal drive.
- System Recovery and Repair: Boot outside of the native operating environment to troubleshoot and repair issues with a computer’s OS or hardware using recovery and diagnostic utilities.
- Data Recovery: Run bootable data recovery software to retrieve files from a machine that won’t start normally due to system failure or malware.
- Live Linux Environments: Run a Linux distribution directly from USB without installing anything to the internal drive – useful for testing distros, privacy-focused browsing, or carrying a personal OS environment.
A multiboot USB drive consolidates all of the above into a single flash drive. Rather than carrying multiple USB sticks, one YUMI drive can hold Windows installers, Linux distros, antivirus tools, recovery utilities, and custom ISO files – all accessible from one boot menu.
How to Create a Bootable USB Drive
To create a bootable USB, you need software that copies the necessary boot files to the drive and configures its boot sector so a computer can recognize and start from it. YUMI handles all of this automatically.
Using YUMI as your multiboot USB creator lets you add, remove, and update ISOs without reformatting the entire drive each time. Whether you’re building a bootable USB for Linux live sessions, Windows installation, or system recovery, YUMI manages the full process in a few clicks.
Before you begin: formatting the drive will erase all existing data. Back up any files you want to keep before proceeding. You may also need to adjust the boot order in your computer’s BIOS or UEFI settings to start from USB instead of the internal drive.
How Can I Boot from USB?
Here are the steps to boot a computer from a YUMI USB drive:
- Insert the prepared YUMI USB drive into your computer and power on or restart.
- As the system starts (when text first appears on screen), press your BIOS or UEFI hotkey – commonly F2, F8, F9, F11, F12, or Del. See: how to access BIOS or UEFI.
- In the boot device list, set your USB drive as the first boot device.
- Save and exit (usually F10).
- Your system will restart and boot from the USB drive into the YUMI boot menu.

Once booted, select the operating system or tool you want to launch from the YUMI menu. Your internal drive and its installed OS remain untouched.
YUMI USB Multiboot Software Variants
YUMI has evolved through several generations since its original release in 2011. The latest versions are listed below, starting with the newest actively developed release.
YUMI Py
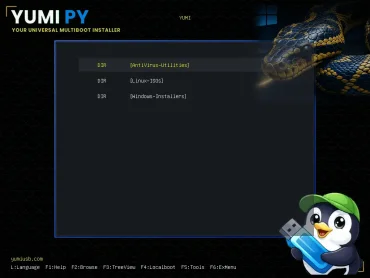
YUMI Py is the next generation of YUMI, rewritten in Python for cross-platform support. It brings the familiar YUMI multiboot experience to both Windows and Linux with a modern graphical interface, improved portability, and a foundation for future development.
YUMI exFAT
 YUMI exFAT is the latest version and the only one actively maintained. It supports both UEFI and legacy BIOS booting, ISO files larger than 4GB, persistent storage up to 40GB for supported Linux distributions, and drag-and-drop ISO management – all from a single exFAT-formatted drive. Available for Windows and Linux, it is the recommended version for all new multiboot USB projects.
YUMI UEFI
 Developed as motherboard manufacturers transitioned from BIOS to UEFI, YUMI UEFI supports both boot modes but requires a FAT32-formatted drive, which limits individual ISO files to 4GB or less. No longer actively developed, it remains useful for users who specifically need a FAT32-only multiboot USB solution.
YUMI Legacy
 The original YUMI release, first made public in March 2011. YUMI Legacy supports BIOS-only booting with NTFS or FAT32 formatting. No longer in active development, it remains a lightweight and stable option for older hardware that requires legacy boot support.
Note: Only YUMI exFAT is recommended for new builds. It uses the most current USB boot methods for both UEFI and BIOS systems and receives ongoing updates and distribution support. If there are specific distributions or features you’d like to see added, feel free to get in touch. If you find YUMI helpful, sharing a link helps others discover it.