YUMI exFAT is a streamlined multiboot bootable USB drive creation tool for Windows users. With support for ISO files larger than 4 GB, it lets you build a single flash drive to boot various operating systems, utilities, and recovery environments.

With BIOS and UEFI compatibility, YUMI lets you boot live Linux distros, Windows installers, antivirus tools, disk cloning apps, forensic utilities, and more,all without using complex terminal commands.
What Is YUMI?
YUMI (Your Ultimate Multiboot-USB Installer) replaces older tools like the Universal USB Installer and Multiboot ISOs. It creates a clean folder structure on the USB drive, storing each ISO in a dedicated directory, so your drive remains both a boot medium and standard storage device.
Although originally designed for live Linux environments, YUMI is equally capable of installing Linux or Windows from USB. If you encounter any compatibility issues with specific distributions, your feedback helps improve future versions.

Key Advantages of YUMI exFAT
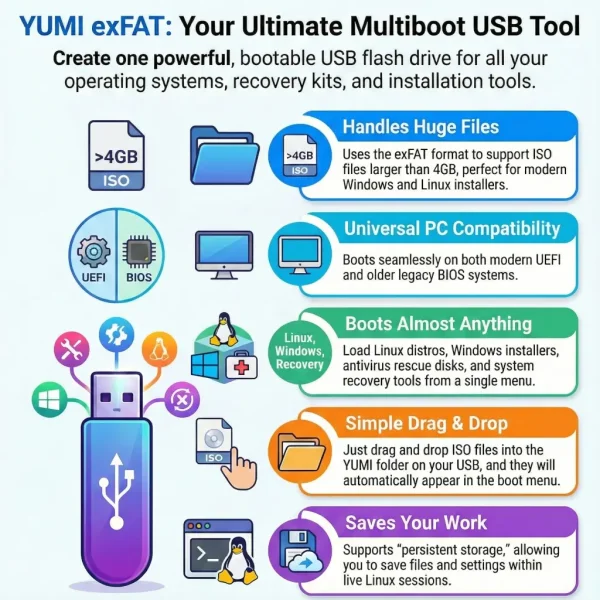
- Supports large ISOs: exFAT partitions allow files over 4 GB, ideal for modern operating systems and apps.
- BIOS + UEFI ready: Works seamlessly with both firmware types for wide device compatibility.
- Persistence support: Save data in live Linux systems, up to 40 GB on supported distros.
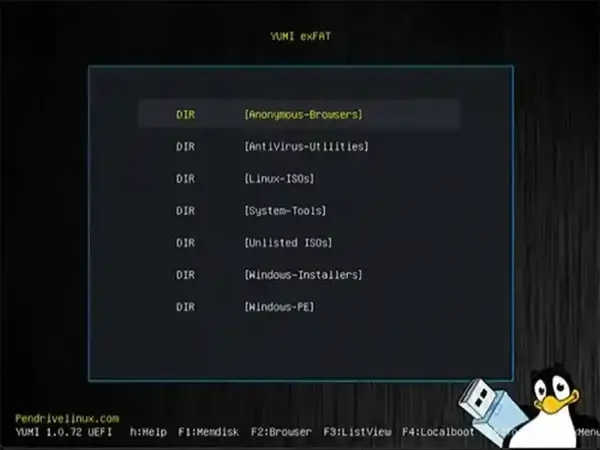
- Drag and drop ISO convenience: Simply place ISOs in the YUMI folder or any sub-folder under it and they’ll appear in the boot menu.
- Compatible with Ventoy: Integrates Ventoy’s bootloader for enhanced flexibility.
- Free and open source: All versions come with full source code upon release.
How YUMI exFAT Works
1. Run the Windows based installer.
2. Choose your USB drive, YUMI auto-detects all connected volumes.
3. Select an ISO or use drag‑and‑drop for additional files.
4. (Optional) Set up persistence storage for Linux distributions.
5. Click Create, and YUMI partitions the drive, adding a FAT32 bootloader and an exFAT storage volume.
6. Boot from the USB to enjoy your live or installable environments.
Download & Installation
Last updated: Feb 08, 2026
SHA-256: 940ae9a7694aad570fc04fe3ed6647b6f142331160103d31631a5e1073a9be87
Important: Preparing the USB will delete all existing partitions. Please backup any important files first.
Changelog
- 02/08/2026 – YUMI-exFAT-1.0.3.5.exe: Added preparation menu with options for reserving unformatted space and selecting the storage filesystem.
- 02/03/2026 – YUMI-exFAT-1.0.3.4: Fixed Debian Persistence. Disabled automatic update checking at runtime.
- 01/06/2026 – YUMI-exFAT-1.0.3.3: Add an entry for AerynOS. Update to use Ventoy 1.1.10 bootloader addressing the following upstream issues: Fixed LinuxGUI program crash issue in wayland environment. Fixed boot issue with Kylin Server V11. Fixed Windows boot issue in F2 mode. Fixed the vhd.vtoy file boot issue in ext4 file system.
- 12/15/2025 – YUMI-exFAT-1.0.3.2: Update to use Ventoy 1.1.09 bootloader which adds better support for OpenSuSe.
- 09/12/2025 – YUMI-exFAT-1.0.3.1: Now includes Ventoy 1.1.07, and support for TrueNAS.
System Requirements & Tips
- A USB drive (8 GB+, SSD-style recommended; 128 GB–1 TB ideal)
- Windows 7, 8, 10, or 11
- A computer capable of USB boot
- YUMI installer and your desired ISO files
Great results come from fast flash drives, see our fastest USBs guide.
User Instructions
The following are instructions for using YUMI exFAT to make a Multiboot bootable USB flash drive from within Windows or Linux:
On Windows
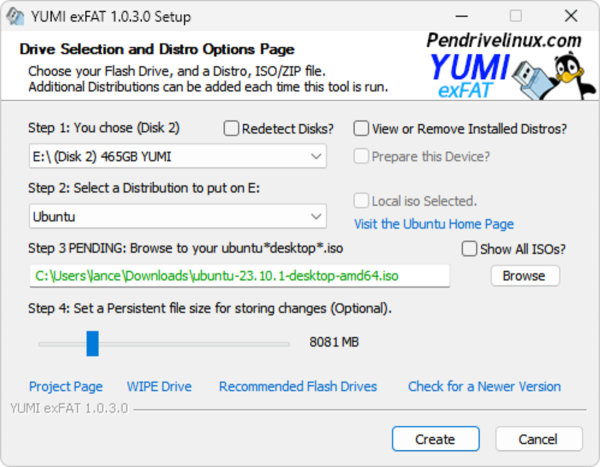
- Run YUMI and follow on screen prompts.
(1.) Select and prepare your USB drive.
(2.) Select a Distribution or tool to run from USB.
(3.) Browse to the ISO file (select download if you’d like).
(4.) Optionally set a Persistent file Size.
(5.) Click Create.
Preparing a bootable USB drive 
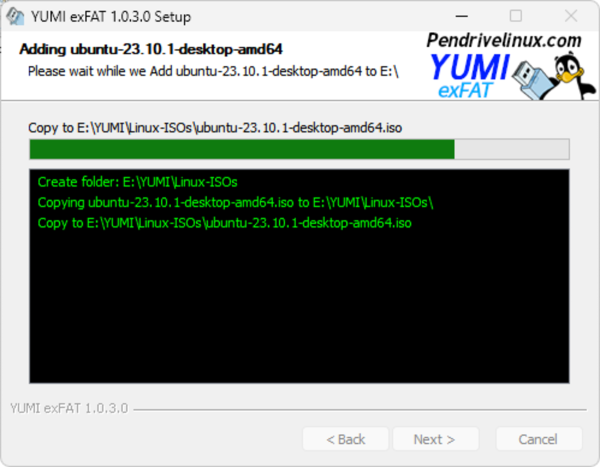
YUMI shown Copying ISO to USB - Re-run to add or remove ISOs as needed.
- Restart and choose USB from your BIOS/UEFI boot menu.
- Select the desired tool or OS at startup and proceed.
On Linux (Ubuntu)
- Open a terminal (
Ctrl+Alt+T) - Run:
cd ~/Desktop wget https://yumiusb.com/downloads/YUMI/YUMI4Linux.tar.gz tar xzvf YUMI4Linux.tar.gz cd YUMI4Linux chmod +x ./YUMI.sh && sudo ./YUMI.sh - The installer launches the Windows .exe via WINE to prepare your USB drive.
- Reconnect the USB and use WINE to run additional YUMI operations later:
wine YUMI-exFAT-*.exe
How YUMI Multisystem USB Works
YUMI places each ISO in its own folder and updates the boot menu accordingly. You can also add ISOs by hand, just drop them into the YUMI folder.
Note: To switch from older MultibootISO or legacy variants, reformat and start fresh, YUMI exFAT is not backwards compatible with those.
Booting from a USB Flash Drive
Here are the steps to USB Boot into any installed Operating System or Tool that you’ve previously added to your drive.
- Accessing BIOS or UEFI Settings – Restart your computer and proceed to access your BIOS or UEFI. This is usually done by pressing F2, F12, Delete, or the Esc key. Refer to your computer or motherboard manual to find the correct key for your system.
- Change Boot Order – In the BIOS/UEFI settings, navigate to the “Boot” or “Boot Order” section. Change the boot order so that the USB drive is the first boot option. This allows the computer to check the USB drive for bootable media before trying the internal storage.
- Save Changes and Exit – Save the changes you made to the boot order and exit the BIOS/UEFI settings. This will restart your computer.
- Finally, Select an OS to Boot – Your computer should now be booting from the USB drive into a Boot Menu. Simply select the Operating System or Tool you wish to boot from and then press enter. Now follow any additional prompts to make selections for custom booting.
That’s really all there is to it. If all went well, then you should be booting your favorite distributions from your custom MultiBoot USB drive!
Supported Bootable USB Operating Systems and Tools
Below is a categorized list of supported bootable ISO distributions that can be installed and launched from a USB flash drive using YUMI exFAT. These include popular Linux Live environments, lightweight portable OS tools, Windows installers, penetration testing suites, antivirus utilities, and system recovery kits.
Linux Distributions (Live & Install)
| Distribution | Supported Versions / Notes |
|---|---|
| Debian |
|
| Ubuntu & Variants |
|
| Fedora | Fedora Live USB with persistence |
| Linux Mint | Create a bootable Linux Mint USB with persistence |
| Arch & Arch-based |
|
| Other Popular Linux Distros |
|
Lightweight & Netbook-Friendly Linux Distros
| Distro | Details |
|---|---|
| Puppy Linux | Lucid, Slacko, Fatdog64, Precise, Racy, Wary |
| Others |
|
Penetration Testing & Security Distributions
Bootable USB-ready ethical hacking and cybersecurity distros:
| Popular Tools |
|
Antivirus Rescue Tools
| Recovery Disks |
|
System Recovery & Disk Tools
Bootable USB system utilities for data recovery, backup, partitioning, and diagnostics:
| Examples |
|
Windows Installers & Boot Tools
| Windows Bootable Tools |
|
Unlisted & Custom ISO/IMG Support
YUMI also supports many unlisted ISOs. Simply try adding them as “Unlisted ISO” and test booting them:
- Unlisted ISO, IMG, WIM, VHD(x), VDI.vtoy, EFI file support via drag and drop
What Makes a Linux Distro USB Bootable?
A bootable Linux ISO contains a compressed, self-contained live operating system that can run directly from RAM after being loaded from USB. The YUMI tool automates the process by extracting required boot files, configuring persistence (if available), and placing ISOs into a readable boot menu structure. Unlike traditional tools, YUMI exFAT can support:
- ISO files larger than 4GB
- Persistence for Ubuntu, Debian, Fedora, and Arch-based systems
- Multiple OS boot options on one flash drive
- Both BIOS and UEFI boot modes
How to Choose the Right Bootable Distribution
The right bootable distro for your USB depends on your use case:
- For system recovery: Use Clonezilla, Kali Linux, or Debian Live.
- For security testing: Try Kali Linux USB, BackBox, or Matriux.
- For daily use or portability: Choose Linux Mint, Ubuntu, or Zorin OS.
- For older hardware: Lightweight distros like Puppy Linux, TinyCore, or Slitaz perform best.
You can also test unlisted ISO files directly, just drag and drop them into your YUMI folder and boot. If supported, they will appear in the boot menu automatically.
Download Verified ISOs
To ensure a smooth experience, always download ISO files directly from the official project websites or from trusted mirrors. Verify file integrity with provided checksums (SHA256 or MD5) whenever possible. You can also find many more bootable USB flash drive creation tutorials for most supported ISOs on our official partner site.
Debian Live Persistence on YUMI exFAT
YUMI exFAT supports persistent storage for Debian Live systems by using a loopback persistence file stored directly on the USB drive. This allows Debian to retain installed packages, configuration changes, and user data across reboots while running in live mode.
To make this easy, YUMI includes pre created, compressed sparse 8GB, 16GB, and 2GB Debian persistence images to choose from. When enabled, this file is automatically detected and attached at boot, without requiring a separate Linux partition. Because persistence is stored in a file, it works well on exFAT formatted multiboot USB drives that must remain accessible from Windows.
Expanding Debian Persistence Storage
If more space is required, the default persistence image can be replaced with a larger loopback file.
To use a larger persistence image:
- Create and extract a new persistence file to the
YUMI/Linux-ISOs/directory on the USB drive - Overwrite the existing persistence file
- Keep the filename exactly the same as the original
The Debian live boot process relies on the persistence filename and location to automatically attach it at startup. As long as these remain unchanged, no additional configuration or boot parameters are required.
An example Debian persistence filename:
debian-live-13.3.0-amd64-gnome.persistenceWhy Debian Persistence Behaves Differently
Recent official Debian Live releases introduced upstream changes that affect how persistence is handled. Unlike many Ubuntu or Arch based live systems, Debian now expects a specific persistence layout to be present.
Modern Debian Live images require:
- A persistence file or volume named and labeled
persistence - A
persistence.conffile inside the persistence image - The configuration entry
/ unioninsidepersistence.conf - The persistence boot option to be present during startup
YUMI exFAT version 1.0.3.4 includes fixes that address Debian Live persistence issues caused by these upstream changes, restoring reliable persistence support for newer Debian releases.
Filesystem Compatibility
Debian persistence on YUMI exFAT operates entirely from a loopback file rather than a dedicated Linux partition. This allows persistent Debian Live systems to function on exFAT formatted USB drives while remaining fully compatible with Windows systems and multiboot configurations.
Debian vs Ubuntu Persistence on YUMI exFAT
While both Debian and Ubuntu support persistent live USB sessions in YUMI exFAT, they handle persistence differently. Ubuntu uses the casper system and typically relies on a persistence file named casper-rw, which YUMI can create and manage automatically without additional configuration. Debian Live, on the other hand, uses the live-boot framework and requires a persistence file labeled persistence that contains a persistence.conf file with a defined union layout. Because of these upstream differences, Debian persistence is more strict about file naming and configuration, whereas Ubuntu persistence is more forgiving and works out of the box in most cases.
Troubleshooting & Tips
Here are a few tips for troubleshooting, should you encounter any issues:
Exclude a Drive from the Media Creation Tool
Create an empty excludedrive.txt on the USB root to prevent detection by YUMI.
Boot Fixes
- Add
acpi=offfor laptops with ACPI conflicts (e.g., some Lenovo models). - If you get floppy errors (
fd0), addfloppy.allowed_drive_mask=0or disable floppy in BIOS. - For Tails on SanDisk “fixed” drives, remove
live-media=removablefrom config.
Frequently Asked Questions (FAQ)
Here are some of the most frequently asked questions we get from our users:
What Linux distributions can I boot from USB?
You can boot hundreds of Linux distributions using YUMI exFAT. Popular options include Ubuntu, Debian, Fedora, Linux Mint, Arch, Kali Linux, Puppy Linux, and more. Most are supported in both Live and Persistent modes.
Can I run multiple bootable ISOs from one USB flash drive?
Yes! YUMI allows you to store and boot multiple ISOs from the same flash drive. A boot menu will appear on startup, letting you choose the operating system or tool to launch.
Can I use YUMI to install Windows from a USB stick?
Absolutely. You can use YUMI to create bootable USB Windows installers for Windows 11, 10, 8, and even Windows 7. You can also boot Windows from a VHD file using the exFAT variant. Run Windows from USB.
What is persistent storage and how does it work?
Persistent storage lets you save changes, documents, and installed software when running a live Linux distro. YUMI can create persistent files (up to 40GB) for Ubuntu, Debian, Fedora, and Arch-based distributions.
Can I try unsupported ISOs with YUMI?
Yes. YUMI supports unlisted ISOs via drag and drop. Just copy the ISO to the USB drive’s designated folder. If compatible, it will appear in the boot menu on startup.
Why Choose YUMI exFAT USB Software?
This versatile media creation tool simplifies multiboot USB creation with features like drag and drop ISO support, Live Linux download links, dual firmware compatibility, Ventoy integration, and optional persistence.
- Supports large files and drives
- Easy drag and drop ISO to USB
- Live Linux bootable ISO download links and authors site links provided
- BIOS/UEFI support
- Optional persistent storage
Remember to always backup your data before prepping the drive with this media creation tool. If you need help, run into issues with this USB boot software, or want to see a new distro supported, please get in touch.
Happy booting!
